DaisyDisk Alternatives for Mac: Free Options, Paid Options, and Finder
DaisyDisk maps your Mac's drive as a colored wheel so you can see what is eating the space, then drag those files out. Most DaisyDisk alternatives do the same two jobs with a different picture. Finder and System Settings already do both, for free, with nothing to install.
What DaisyDisk actually does
DaisyDisk scans a drive and draws every folder as a slice of a ring. Big slices are big folders. You click into a slice to go deeper, drag what you do not want to a holding area, then delete it in one go. That is the whole app.

It reads sizes and it deletes files. It does not speed up your Mac, scan for malware, or uninstall apps. That last point matters, because the two jobs get mixed up often. Clearing out an old app and the files it left behind is manual work, as in removing Sublime Text and the subl command it leaves behind.
It costs $9.99 as a one time purchase, covers up to five personal Macs, and needs macOS 10.13 or newer. Version 4.34.2 shipped in July 2026.
Why people look for DaisyDisk alternatives
The reasons are ordinary, and none of them means the app is bad.
- Price. Ten dollars is small, but it is money for a tool you open twice a year.
- One time need. Most people open a disk space analyzer on Mac when the drive fills up, then forget it.
- Older hardware. If your Mac is stuck on an older macOS, the newest build may not run.
- Scope. Some people want an app that also finds duplicates. DaisyDisk stays narrow on purpose.
- Permissions. Any tool that reads your whole drive needs Full Disk Access. Not everyone grants that.
A sixth reason gets less airtime: once you know where the space goes, you can find it in Finder in about five minutes.
The manual method that needs none of these
Work through this in order and you will often find the missing space before you reach the app list.
Start with Storage in System Settings, then read it carefully
On macOS Ventura 13 and later, open the Apple menu, choose System Settings, click General in the sidebar, then click Storage. On older versions, open the Apple menu, choose About This Mac, then Storage. Apple lists both paths in its guide to freeing up storage space on Mac.
You get a colored bar and a list of categories. It is a good first look and a poor second one. System Data is a bucket for anything macOS cannot label neatly, so a big number there tells you little.
The same screen offers three options: Store in iCloud, Optimize Storage, and Empty Trash automatically. Apple explains what each one moves or deletes on its page about optimizing storage space. Read them first, because Store in iCloud changes where your files live.
Turn on Calculate all sizes in Finder
Finder can show folder sizes, but the setting is off by default. That one switch is what makes a manual audit work.
Open any folder, switch to List view, then choose View and Show View Options, or press Command J. Turn on Calculate all sizes. Now click the Size column header, and the biggest folder rises to the top. Apple documents the panel in change view options in the Finder.
Start at your home folder and repeat: sort, open the biggest, sort again. Four or five rounds land you on the real culprit. It is the same walk a disk map makes you do with a mouse.
Build a smart folder that finds every large file at once
Sorting works folder by folder. A smart folder searches the whole drive in one pass.
In Finder, choose File and then New Smart Folder. Click the plus button on the right. Open the first pop up menu, choose Other, and pick File Size. Set it to "is greater than" and type 500 MB. Switch the bar from Shared to This Mac.
You now have a live list of every large file on the Mac. Apple covers the steps in create or change a Smart Folder.
Check Downloads and old device backups first
Two folders account for most surprise storage on a normal Mac.
The first is Downloads. In Finder, choose Go and then Downloads, then sort by size. Installers, disk images and video files pile up there for years because nothing clears them out.
The second is iPhone and iPad backups, often tens of gigabytes. In Finder, choose Go, then Go to Folder, and enter ~/Library/Application Support/MobileSync/Backup/. Do not delete anything inside by hand. Connect the device instead, click it in the Finder sidebar, open the General tab, click Manage Backups, then right click a backup and choose Delete. Apple sets out both steps in locating and managing device backups.
Tell purgeable space and snapshots apart from real files
This is where people lose an afternoon. Storage says 60 GB is used by something, Finder shows nothing like it, and the hunt begins for files that do not exist.
Most of that gap is Time Machine local snapshots. If Back Up Automatically is on and your disk uses APFS, macOS saves a snapshot of the startup disk about every hour and keeps it for 24 hours. Apple explains this in about Time Machine local snapshots.
Snapshots are not files, so you cannot find them in Finder and should not try. macOS also counts their space as available, which is why the free space figure looks better than what you can see.
Leave them alone. macOS deletes old snapshots as they age and as space is needed, so copying a large file onto the disk usually makes it hand the room back.
Two Terminal commands, if you want them
Neither of these deletes anything. Both only report. Open Terminal from Applications and then Utilities.
Type du -sh ~/* and press Return for the size of every folder in your home folder. Add | sort -h to put the biggest last. Type tmutil listlocalsnapshots / to list the snapshots on your startup disk. If several come back, you have found the missing gigabytes.
What to do when the numbers still do not add up
- Storage keeps changing while you watch. macOS is still counting. Give it a few minutes after a restart.
- A folder shows a size but opens empty. Its contents need permission. Check Privacy and Security in System Settings.
- Space vanishes again a day later. Something is still writing logs or caches. Helpers left by an app you dragged to the Trash are a common source, which is what a full Trend Micro removal is about.
- The Trash is full. Deleted files keep their space until the Trash is emptied.
Apps people compare it with
These are the tools that come up most often on this search. What follows is a plain description of each, not a ranking. None of them is required.
GrandPerspective (free)
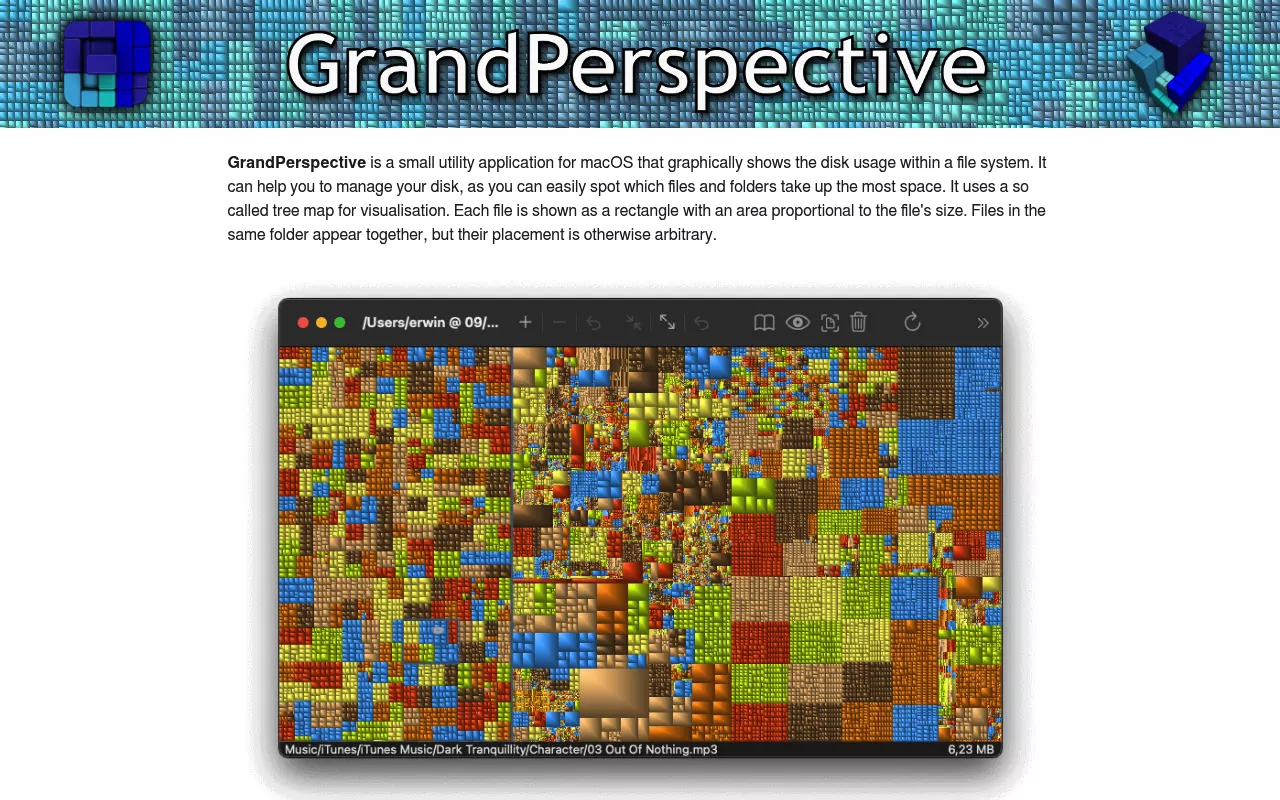
GrandPerspective visualizes disk usage as a tree map: one rectangle per file, sized by the room it takes. It is open source under the GPL and free from SourceForge. The same app is $2.99 on the Mac App Store, which the developer says covers distribution.
Version 3.8.0 arrived in August 2026 and needs macOS 14 or later. Older builds stay online, including 3.7.2 for macOS 11 through 13. It maps and deletes, and that is all.
OmniDiskSweeper (free)
OmniDiskSweeper skips the graphics. It lists files and folders largest to smallest in plain columns, and lets you open them or trash them. The Omni Group made it free in 2009 and still updates it, most recently as version 1.16 in September 2025.
The limit is what makes it fast: no chart, no filters, no duplicate finding.
Disk Xray (paid)
Disk Xray from Naarak Studio bundles more than a scanner. Next to the folder view it finds duplicate files, spots similar photos, clears caches and logs, shreds files, and removes apps. It runs on macOS 10.13 or later, and the maker lists it as ready for macOS Tahoe.
A single user license is $29 as a one time purchase, with $59 for five business Macs and $249 for a site license. A free Lite build is also offered. The limit is scope: you buy six features to use one.
WhatSize (paid)
WhatSize shows sizes in a Finder style column view rather than a chart, so you drill down the way you already do. It also carries cleanup tools for logs, caches, temporary files and unused app language files.
It is $14.99 as a one time purchase, with a $9.99 upgrade price and a 30 day trial. Version 8.2.9 covers macOS Tahoe 26 and Sequoia 15, and builds go back to Big Sur 11. The cleanup side touches system files, which is the limit.
Storage in System Settings (already installed)
The built in option belongs on this list, because it is already there. You get the category bar, the three recommendations, and a per app list under Applications. The limit is real: it will not show you one large file inside a folder.
Comparison at a glance
| App | License and price | What it is for | Notable limit |
|---|---|---|---|
| Finder and System Settings | Built into macOS, free | Sorting by size, smart folders, the storage bar | No single view of the whole drive |
| DaisyDisk | $9.99 one time | Ring chart of disk use, drag to delete | Reads and deletes only, no uninstalling |
| GrandPerspective | Free, GPL. $2.99 on the Mac App Store | Tree map of every file by size | Newest build needs macOS 14 or later |
| OmniDiskSweeper | Free | Plain list of files, largest first | No chart and no filters |
| Disk Xray | $29 one time, single user | Scanning plus duplicates, cleanup, app removal | Broad scope you may not need |
| WhatSize | $14.99 one time, 30 day trial | Column view of sizes plus cleanup tools | Cleanup touches system files |
Frequently Asked Questions
Is there a truly free DaisyDisk alternative?
Yes. GrandPerspective is free and open source, and OmniDiskSweeper is free from The Omni Group. Finder is free too, and with Calculate all sizes turned on it answers the same question.
Is it safe to delete the big files a disk analyzer finds?
It depends on the file, and no app can judge that for you. Your own videos, downloads and old device backups are safe to remove. Anything inside a System folder or an app's own package should be left alone.
Why does my Mac say storage is full when Finder shows nothing big?
Usually Time Machine local snapshots. macOS keeps hourly snapshots of the startup disk for 24 hours and counts that space as available, so the numbers disagree. It clears them when the room is needed.
Will deleting files this way break an app?
It can, if you delete inside an app's support folders while the app is installed. Removing files that belong to an app you no longer want is a separate job, and security tools are the strictest case, as a proper Kaspersky removal shows.
Can I delete built in Apple apps to save space?
Many of them, yes, but the core ones are protected by macOS. Safari is the usual example, and there is a longer answer in our guide on uninstalling Safari on Mac.
Try the manual route before you pick an app
The shortest route to free space usually involves no download. Turn on Calculate all sizes, build the 500 MB smart folder, then check Downloads and old device backups. If you still want one picture of the whole drive, the apps above draw one, and any of them will do it.
If what you really want is to remove an app rather than a file, that is a different job. Our per app removal guides cover it by hand, with nothing to install, from the command line leftovers Sublime Text hides to the background helpers a security suite keeps running.