What Is System Data on Mac, and How to Clear It Safely
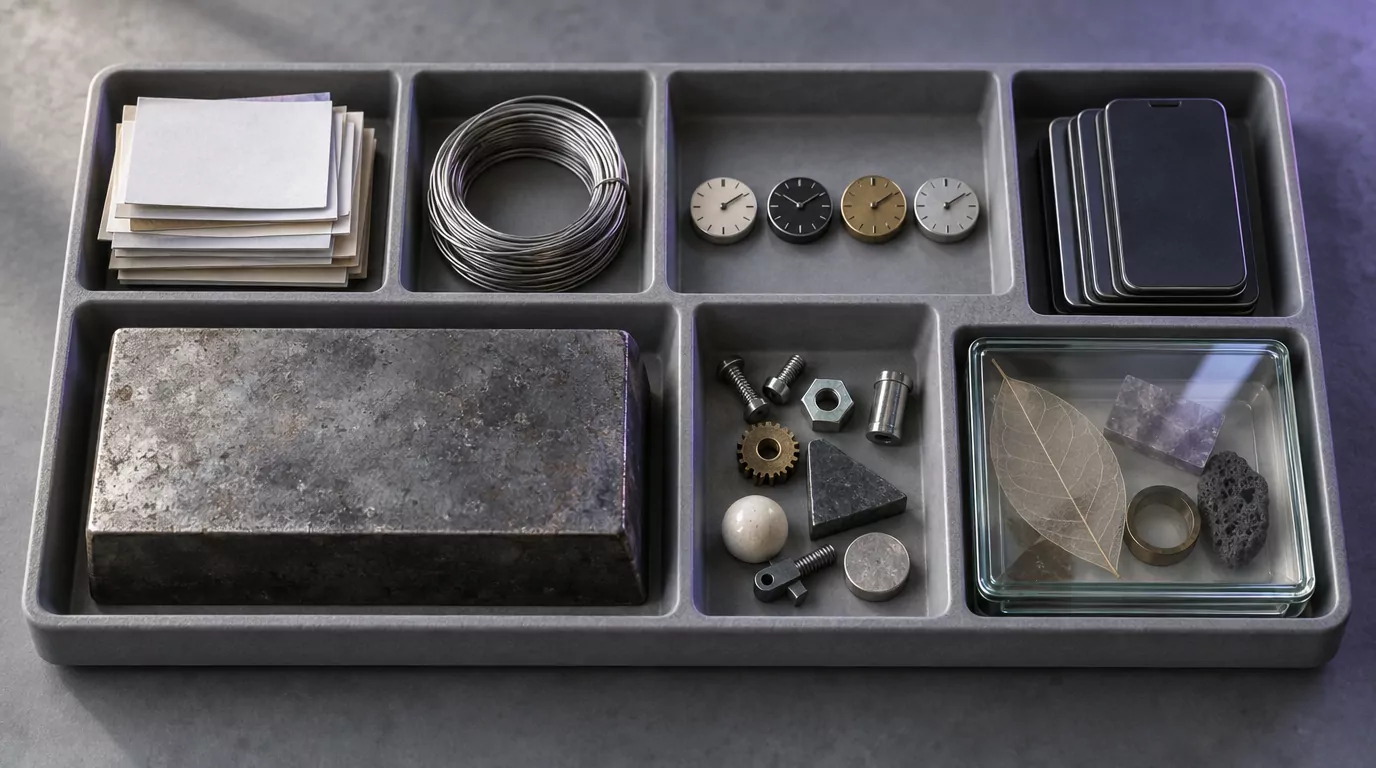
System Data is the catch-all storage category macOS uses for files that do not fit Applications, Documents, Photos or the other named groups. It holds caches, logs, local Time Machine snapshots, old iPhone and iPad backups, virtual machine and container disk images, and files left by removed apps. To clear System Data on Mac safely, restart, delete old device backups, let snapshots go, and remove app leftovers you recognise.
This guide shows how to clear System Data on Mac with tools you already have: Finder, System Settings and, for one optional check, Terminal. You do not need a cleaner app. Every step below is either Apple's own method or a plain Finder action you can undo until you empty the Trash. Often the biggest piece is data left by apps you already removed, such as the disk image described in the Docker removal guide.
What System Data on Mac actually is
Apple describes System Data as a general category. It measures the space used by all Apple and third-party files that do not belong to a more specific category. In older versions of macOS the same category was called Other. You can read Apple's wording on its Free up storage space on Mac page.
Where you find the bar depends on your macOS version. In macOS Ventura 13 or later, open the Apple menu, choose System Settings, click General, then click Storage. In earlier versions, choose About This Mac from the Apple menu and click Storage.
Two things about that bar matter before you start. First, it is an estimate, and it can take several minutes to finish counting after a restart or a big deletion. Second, the Storage screen gives you a review list for categories like Applications and Documents, but System Data does not get one in the same way. That is why you have to know what tends to live inside it.
What usually sits inside System Data
| Item | Typical location | Safe to remove? | How |
|---|---|---|---|
| User caches | ~/Library/Caches |
Per app only. They come back as apps run. | Quit the app, then remove its own cache folder (step 5) |
| Logs | ~/Library/Logs |
Yes for apps you removed, but the gain is small | Move a removed app's log folder to the Trash |
| Local Time Machine snapshots | Managed by macOS on the startup disk | Yes, through Apple's method only | Turn off automatic backups for a few minutes (step 3) |
| iPhone and iPad backups | ~/Library/Application Support/MobileSync/Backup/ |
Yes, old ones | Finder, then Manage Backups (step 2) |
| Virtual machine, container and simulator disk images | Depends on the app (see the linked guides) | Yes, once you no longer need them | Follow that app's removal guide (step 4) |
| Support files from apps already dragged to the Trash |
~/Library/Application Support, ~/Library/Containers, ~/Library/Group Containers
|
Only folders that clearly belong to a removed app | Move the matching folder to the Trash (step 4) |
| Swap files and the sleep image |
/System/Volumes/VM on current macOS, /private/var/vm on older releases |
No. macOS manages them. | A restart resets swap (step 1) |
| System files | /System |
Never | Leave them alone |
Most of the space you can safely win back is in the middle rows: device backups, snapshots, disk images and the leftovers of apps you already removed. Caches and logs help a little. The last two rows are part of macOS itself.
Why System Data takes up so much space on Mac
System Data grows for a few ordinary reasons. None of them means something is wrong with your Mac.
Time Machine snapshots wait until space is needed. If you use Time Machine, your Mac keeps local snapshots on the startup disk. macOS deletes them as they age or when it needs the room, so the grey bar can look large even though that space is still available to you.
Device backups pile up over the years. Each time you back up an iPhone or iPad to your Mac, the backup lands in your Library folder. Old backups of phones you sold or replaced stay there until you remove them.
Developer tools, virtual machines and AI models are huge. A single virtual machine, a container disk image or a set of local AI models can each take tens of gigabytes. Storage often counts these files as System Data rather than as Documents.
Apps dragged to the Trash leave data behind. This is the cause most people miss. The Trash removes only the app bundle. Settings, caches, containers and disk images stay in your Library folder, and Storage files them under System Data.
Smaller drives feel it sooner. On a MacBook Air or any Mac with a small startup disk, the same snapshots and backups take up a larger share of the bar. The steps below are the same on every model; the difference is only how soon you notice.
Before you delete anything
A few minutes of care here keeps this job safe. Read these rules once before you start the steps.
- Back up first. Run a Time Machine backup to an external disk, or confirm your last one finished. If you remove the wrong folder, you can bring it back.
-
Never touch
/System. It holds macOS itself and is protected for a reason. - Never turn off System Integrity Protection to delete files. Nothing in this guide needs it.
-
Never run
sudo rm -rfon cache folders. One typo in that command can delete far more than you meant, with no Trash to catch it. - Delete only what clearly belongs to an app you no longer use. If a folder name means nothing to you, leave it.
- Empty the Trash at the end. As Apple notes, space does not come back until you empty the Trash.
If you are short on space in general, not only in System Data, Apple's guide to optimizing storage space covers the other categories. This guide stays with System Data.
How to clear System Data on Mac safely
Work through these steps in order. The early ones are quick and safe, and they often explain most of the grey bar before you open a single Library folder.
1. Restart your Mac and let Storage recalculate
A restart clears temporary files and resets swap, the space macOS uses as overflow memory. It is the easiest step and costs nothing.
- Save your work and choose Restart from the Apple menu.
- After you log in, open System Settings, click General, then click Storage.
- Wait a few minutes for the bar to settle before you judge the System Data number.
Write down the System Data figure now. It gives you a starting point to compare against at the end.
2. Delete old iPhone and iPad backups
Device backups are often the largest safe item in System Data. Apple explains where they live and how to manage them in Locate and manage backups of your iPhone, iPad, and iPod touch.
To see them, open Finder, choose Go, then Go to Folder, and paste ~/Library/Application Support/MobileSync/Backup/. Each folder inside is one backup. Look, but do not delete from here, because the folder names do not tell you which device they belong to.
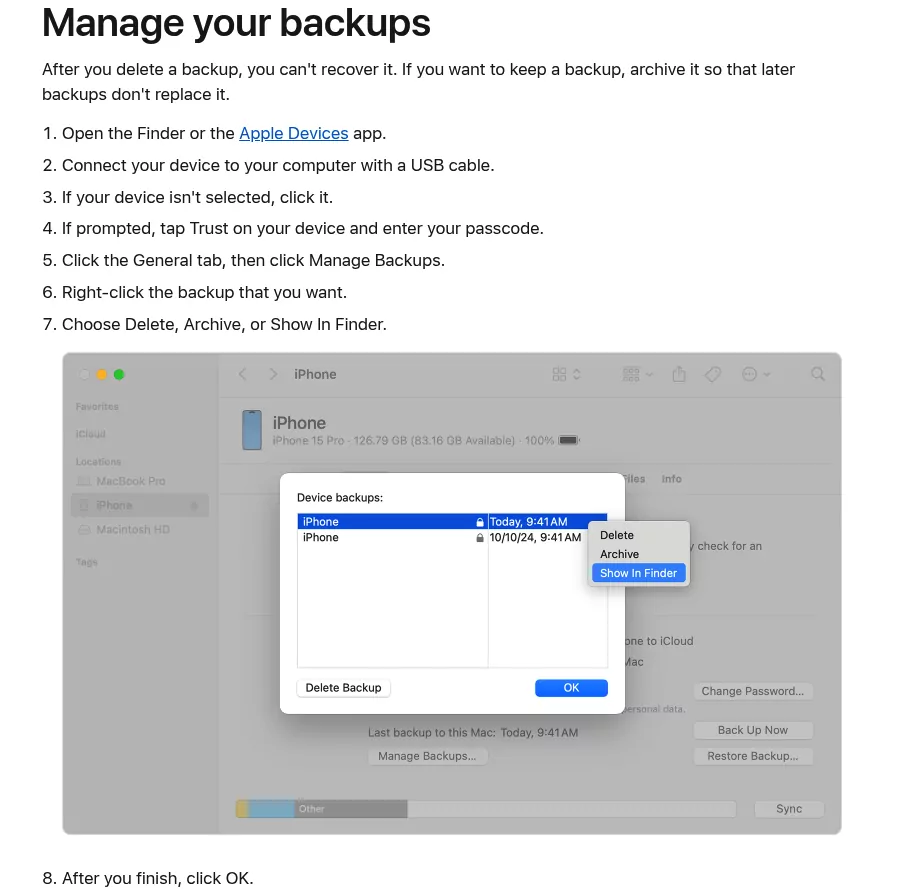
To delete one the way Apple describes (macOS Catalina 10.15 or later):
- Connect your iPhone or iPad to your Mac with a USB cable.
- Open Finder and select the device in the sidebar. If asked, tap Trust on the device and enter its passcode.
- Click the General tab, then click Manage Backups.
- Right-click the backup you want to remove and choose Delete. Choose Archive instead if you want to keep it safe from being replaced.
- Click OK when you finish.
On macOS Mojave 10.14 or earlier, you manage the same backups in iTunes. A deleted backup cannot be recovered, so keep the newest one for each device you still own. Backups of phones you no longer have are the easy wins.
Backups stored in iCloud are a separate matter. They live in your iCloud storage, not on your Mac's disk, so deleting them does not shrink System Data. Only the backups Finder lists under Manage Backups count here.
3. Let Time Machine clear local snapshots
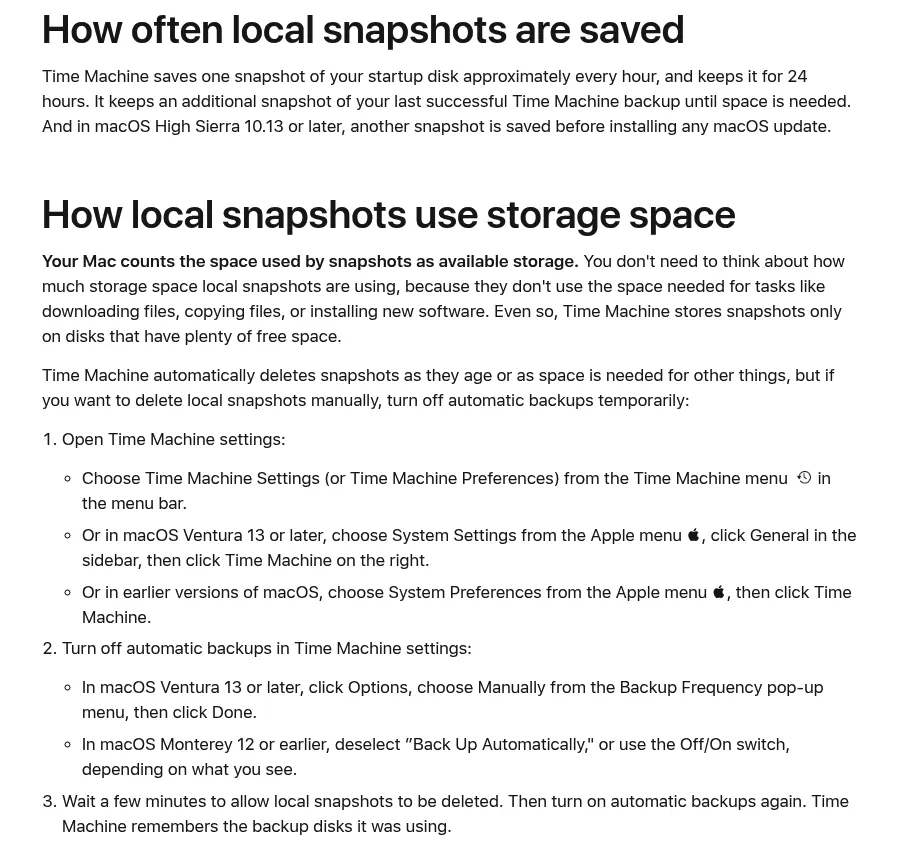
Apple's page About Time Machine local snapshots sets out how they work. Time Machine saves a snapshot of your startup disk about every hour and keeps it for 24 hours. It keeps one more snapshot of your last successful backup until space is needed, and it saves another before any macOS update.
Apple also says your Mac counts snapshot space as available storage. macOS deletes snapshots on its own as they age or when space is needed. So clearing them by hand mostly helps in two cases: an install or update says there is not enough room, or the Storage bar keeps showing them under System Data and you want a clean reading.
To clear them with Apple's method:
- Open Time Machine settings. In macOS Ventura 13 or later, open System Settings, click General, then click Time Machine.
- In macOS Ventura 13 or later, click Options, choose Manually from the Backup Frequency menu, then click Done. In macOS Monterey 12 or earlier, deselect Back Up Automatically, or use the Off/On switch.
- Wait a few minutes so macOS can delete the local snapshots.
- Turn automatic backups back on. Time Machine remembers the backup disks it was using.
If you are comfortable in Terminal, tmutil listlocalsnapshots / lists the snapshots on your startup disk without changing anything. Apple's tmutil tool can also delete one with tmutil deletelocalsnapshots followed by the snapshot's date stamp, for example tmutil deletelocalsnapshots 2026-11-05-093012. That is optional. The settings method above does the same job without typing anything.
How much space this returns depends on your Mac. It may be a lot or very little, and the bar may take a few minutes to catch up.
4. Remove leftovers from heavy apps you already deleted
This step often makes the biggest difference. Virtual machines, container disk images, simulators and local AI models can be the largest single items in System Data. They survive when you drag the app to the Trash, because they live outside the app bundle.
Each of these apps keeps its big files in a different place. Rather than repeat every path here, use the guide for the app you removed:
-
Docker Desktop keeps its Linux disk image,
Docker.raw, inside~/Library/Containers/com.docker.docker. The guide to uninstalling Docker on Mac covers it and the rest of Docker's folders. -
Parallels Desktop leaves every virtual machine (each a
.pvmfile) in place when you remove the app. See how to uninstall Parallels Desktop on Mac for where they live and how to keep the ones you need. -
Xcode stores simulator devices in
~/Library/Developer/CoreSimulatorand build data in~/Library/Developer/Xcode. The Xcode removal guide explains which parts to clear inside Xcode first. -
Ollama keeps downloaded models in
~/.ollama/models. The guide to uninstalling Ollama on Mac shows how to keep or remove them. -
Steam keeps installed games in the
steamappsfolder inside~/Library/Application Support/Steam. See how to uninstall Steam on Mac.
Before you delete one of these, check how big it is. Select the file or folder in Finder and press Command and I to open Get Info, which shows its size. That tells you whether it is worth the effort, and it helps you spot the one or two items that explain most of the grey bar.
For any other app you already removed, check three folders by hand:
- In Finder, choose Go, then Go to Folder, and open
~/Library/Application Support. - Look for a folder named after the app or its maker. Some use a reversed web address, such as
com.vendor.app. - Move only that folder to the Trash.
- Repeat in
~/Library/Containersand~/Library/Caches.
If you are not sure a folder belongs to a removed app, leave it. A few megabytes of doubt are not worth a broken app later.
5. Clear caches only for specific apps
Caches are files apps keep so they can load things faster next time. They rebuild as you use the app. That means bulk-deleting ~/Library/Caches only frees space for a short while, and it can make apps slow to start or sign you out.
Some online answers suggest clearing every cache folder at once with an administrator command. Please do not. It gives little lasting space and puts files at risk for no real gain. Clear caches one app at a time instead:
- Quit the app whose cache you want to clear.
- In Finder, choose Go, then Go to Folder, and open
~/Library/Caches. - Find the folder named after that app or its maker.
- Move that one folder to the Trash.
Never touch /System/Library/Caches. macOS manages it, and safe mode (next step) handles the system caches that are safe to clear.
6. Use safe mode to clear some system caches
Apple notes in Start up your Mac in safe mode that safe mode clears some system caches, including font caches and the kernel cache. macOS creates them again as needed. The gain is temporary, but it can be enough room to finish a macOS update.
On a Mac with Apple silicon:
- Shut down your Mac.
- Press and hold the power button until you see Loading startup options.
- Select your startup disk, usually Macintosh HD.
- Press and hold Shift, then click Continue in Safe Mode.
On an Intel-based Mac, turn it on or restart it, then press and hold Shift right away. Release Shift when you see the login window.
To leave safe mode, choose Restart from the Apple menu. Your Mac starts up normally again.
7. Empty the Trash and check Storage again
Everything you moved in steps 4 and 5 is still in the Trash, and it still uses space. Open the Trash, check it once more for anything you want to keep, then click Empty. After that, go back to System Settings, General, Storage, and compare the new System Data figure with the one you noted in step 1.
What not to delete from System Data
Some files show up under System Data but are part of macOS. Removing them can stop your Mac from starting or break features in ways that are hard to fix.
-
/Systemand anything inside it. This is macOS itself. -
Swap files and the sleep image. They live in
/System/Volumes/VMon current macOS and/private/var/vmon older releases. A restart resets swap. -
Folders in
/Libraryyou do not recognise. Many belong to drivers, printers or system services. -
The whole
~/Libraryfolder. It holds your mail, settings and app data, not just leftovers. - Anything Time Machine owns, unless you use Apple's method from step 3.
Two more rules round this out. Do not change System Integrity Protection settings to reach a folder. And skip any "one click" shortcut that promises to clear all of System Data, because no safe version of that exists.
Check that the space came back
Once you finish, restart your Mac. Then open System Settings, click General, click Storage, and give it a few minutes to count.
If the number has not dropped yet, one of these is usually the reason:
- The Trash is not empty. Files in the Trash still count against your disk.
- Snapshots are still being removed. macOS deletes them over several minutes.
- Storage has not caught up. The bar is an estimate and can lag behind real changes.
If System Data is still very large after every step, contact Apple Support rather than trying riskier deletions. They can look at your specific Mac and tell you what the space really is.
Frequently Asked Questions
What takes up the most storage on a Mac?
For most people it is photos, videos and other media, followed by apps. Within System Data, the biggest items are usually old iPhone and iPad backups, Time Machine snapshots, and disk images from virtual machines, containers and simulators. The Storage screen in System Settings shows which categories are largest on your Mac.
Is it a good idea to clear the cache or System Data on a Mac?
Yes, when you clear specific things you recognise: the cache of one app, old device backups, or leftovers from apps you removed. No, when it means bulk-deleting cache folders with administrator commands or touching /System. The targeted route gives lasting space without risk.
Will I lose everything if I clear the cache?
No. Caches hold temporary copies, not your personal files, so your documents, photos and mail stay where they are. An app whose cache you cleared rebuilds it as you use it. It may start a little slower the first time or ask you to sign in again.
Can I clear System Data on Mac with Terminal?
You can, but you rarely need to. tmutil listlocalsnapshots / safely lists local snapshots, and Apple's tmutil deletelocalsnapshots removes one by its date stamp. Avoid rm -rf commands on system or cache folders. Finder and System Settings do everything in this guide more safely.
Why does System Data take up so much space on Mac?
It collects everything that does not fit another category. Time Machine snapshots wait until space is needed, device backups add up over the years, and developer tools and local AI models use many gigabytes. Apps dragged to the Trash also leave their data behind in your Library folder, where it is counted as System Data.
Removing other apps from this Mac
If an app you removed is still using space, its own guide shows exactly what it leaves behind and where. These cover some of the largest System Data sources:
-
How to uninstall Docker on Mac, including the
Docker.rawdisk image - How to uninstall Xcode on Mac, with simulators and build data
- How to uninstall Parallels Desktop on Mac, with your virtual machines
- How to uninstall Ollama on Mac, with local AI models
Every Uninstall on Mac guide is done by hand with Finder, System Settings and sometimes Terminal, with nothing to install. You can browse the full list of removal guides. If your app is not covered yet, email hello@uninstallonmac.com with the app's name and version and your macOS version.