How to Uninstall Malwarebytes on Mac, Extensions and Leftovers Included
To uninstall Malwarebytes on Mac, open it from its menu bar icon, choose Help, then Uninstall Malwarebytes, click I'll risk it, and enter your Mac password. If that fails or a reinstall is blocked, run the vendor's own uninstall tool. Then remove Browser Guard, check Login Items & Extensions, and turn off auto-renewal separately.
This guide on how to uninstall Malwarebytes on Mac removes the app. It does not replace whatever protection the app gave you.
Why dragging Malwarebytes to the Trash is not enough
The app is more than the icon in Applications. It adds a menu bar icon. Its Web Protection and VPN rely on an Endpoint Security extension you approve in System Settings, plus a network content filter, as the vendor's Web Protection article shows.
It also asks for Full Disk Access, and Browser Guard adds parts to your browsers. A Trash drag touches none of this.
Apple says an app's own uninstaller is the best way to delete it along with its login items and extensions. The vendor says bits left from an old install are what make a reinstall fail. Other security apps work the same way, as our guides to removing Kaspersky on Mac and removing Trend Micro on Mac show.
Before you start
- Free the device seat. In the app, click the person icon, choose My subscription, click the three dots on your plan card, then Deactivate subscription. Or do it later online: under Activated Devices, click the three dots, then Deactivate. Both are in the vendor's deactivation article. Its uninstall steps do not say removal frees the seat, so do this on purpose.
- Stop the billing. Deleting an app does not cancel a plan. For Mac, you cancel by turning off auto-renewal in your account. The plan stays active until it ends.
- Have your Mac password ready. You need an admin account.
- Work Mac? A Mac your employer manages may run ThreatDown, the vendor's business line. ThreatDown says admins remove the agent from their console, and an uninstall password may be needed. Ask your IT team.
Step 1: How to uninstall Malwarebytes on Mac from its Help menu
This route comes from the vendor's uninstall article for the current app (version 5.27.1 when this guide was written).
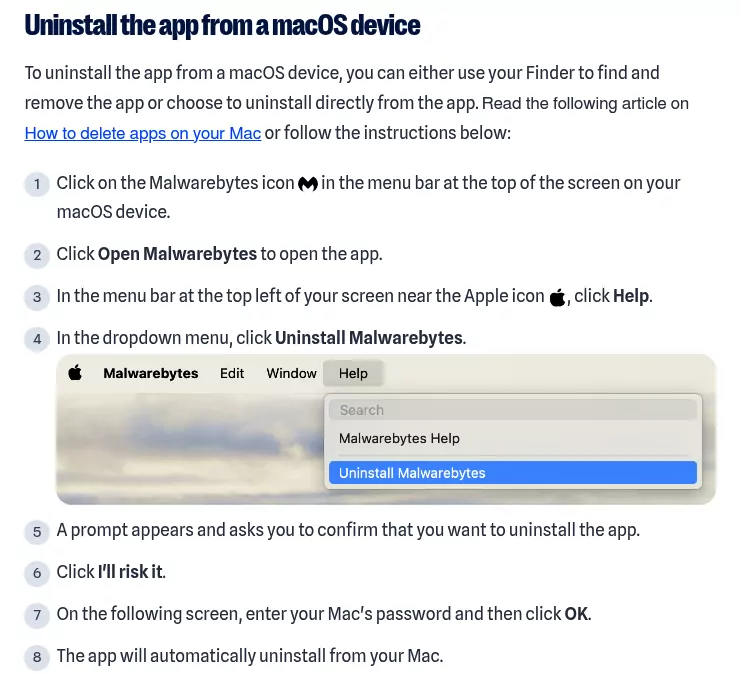
- Click the Malwarebytes icon in the menu bar.
- Click Open Malwarebytes.
- In the menu bar at the top left, near the Apple icon, click Help.
- Click Uninstall Malwarebytes.
- A prompt asks you to confirm. Click I'll risk it.
- Enter your Mac password and click OK. The app removes itself.
"I'll risk it" is the vendor's own label. It sounds scary, but it only confirms the removal.
On the older version 4 app, the Mac v4 User Guide gives the same Help menu route. The prompt asks if you are sure, and you click Yes instead.
Step 2: Run the Malwarebytes uninstall tool if Step 1 fails
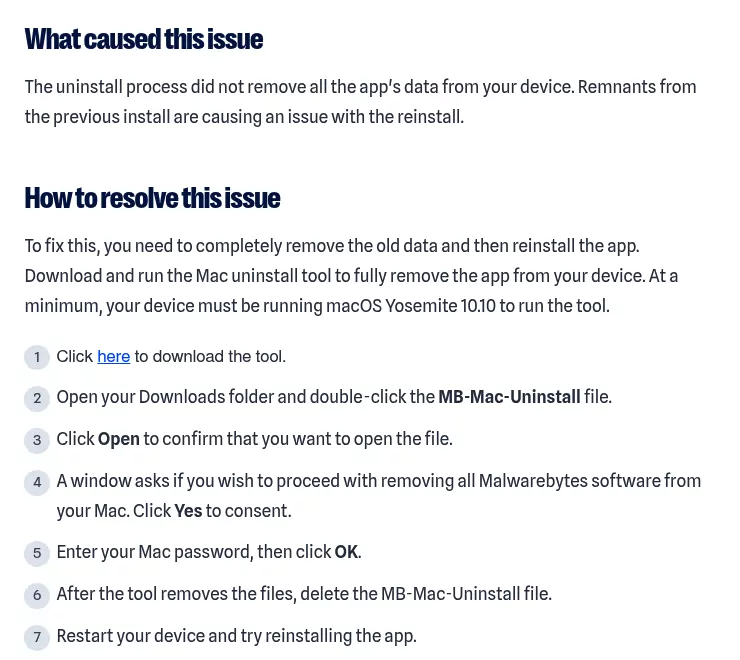
Use this if the app will not open, Help is missing, or a reinstall fails. The vendor's reinstall article blames leftovers from the old install and clears them with this tool. It needs macOS Yosemite 10.10 or later.
- Download the tool from that article. It is a zip file, now named MB-Mac-Uninstall-Reinstall. Safari usually unzips it for you.
- Open Downloads and double-click the tool. The vendor calls it MB-Mac-Uninstall.
- Click Open to confirm.
- When asked whether to remove all Malwarebytes software from your Mac, click Yes.
- Enter your Mac password and click OK.
- When it is done, delete the tool and restart your Mac.
Yes removes all Malwarebytes software. If you also use another Malwarebytes app, such as AzireVPN, check afterwards that it still works and reinstall it if needed.
Step 3: Check the security extension and network filter are gone
The uninstaller should remove the extension you approved. A quick look confirms it.
macOS Sequoia 15, Tahoe 26 and later
Choose Apple menu, System Settings, General, then Login Items & Extensions. On Tahoe, click the By Category tab under Extensions first.
Click the Info button next to Endpoint Security Extensions. No Malwarebytes entry should be left. Check Network Extensions the same way.
Apple's macOS 27 guide lists the same groups, but the vendor's support list stops at Tahoe 26, so labels may differ.
macOS Ventura 13 and Sonoma 14
Here you approved the app with an Allow button in System Settings, Privacy & Security. Apple's page on extension alerts confirms this split. Use the Terminal check below to see that it is gone.
macOS Big Sur 11 and Monterey 12
You approved it in System Preferences, Security & Privacy, behind the padlock. Use the Terminal check below. The vendor dropped Big Sur support in September 2026.
This read-only command lists system extensions and keeps only the Malwarebytes lines:
systemextensionsctl list | grep -i malwarebytesNo output means it is gone. If an entry is waiting to uninstall on reboot, restart and check again.
If it is still listed, run Step 2. Never use this command's reset option, because it hits every system extension on the Mac.
Step 4: Remove Malwarebytes Browser Guard
You remove Browser Guard in each browser's own settings, as the vendor's Browser Guard article explains.
Safari
The Safari version comes from the Mac App Store as Malwarebytes Browser Guard. It adds three parts: Ad and Tracker Blocker, Malware Blocker and Scam Blocker.
Apple's Safari guide gives two ways out. Choose Safari, Settings, Extensions, select each one and click Uninstall. Or delete the app that holds them from Applications.
Safari itself stays put, as our guide on why you cannot uninstall Safari on Mac explains.
Chrome, Edge and Firefox
Repeat this in every browser and profile.
- Chrome: click More, then Extensions, then Manage Extensions. Click Remove on Browser Guard, then Remove again.
- Edge: click Extensions to the right of the address bar. Click More actions next to Browser Guard, then Remove from Microsoft Edge, then Remove.
- Firefox: click the menu button, then Extensions and themes (Add-ons and themes before Firefox 140), then Extensions. Click the three dots next to Browser Guard and choose Remove.
Step 5: Clear Full Disk Access, login items and firewall changes
Full Disk Access. On Ventura and later, open System Settings, Privacy & Security, then Full Disk Access.
On Monterey and Big Sur, open System Preferences, Security & Privacy, click the Privacy tab, then click Full Disk Access in the list on the left. There, the vendor's Full Disk Access article names the entry Malwarebytes Protection. On any version, switch off or uncheck any row that is left.
Login items. In Login Items & Extensions, remove any Malwarebytes item under Open at Login. Then switch off anything from the vendor under Allow in the Background (Sequoia 15) or App Background Activity (Tahoe 26 and later).
On Ventura 13 and Sonoma 14, choose System Settings, General, then Login Items, which has the same Open at Login and Allow in the Background lists.
Firewall. The app's Firewall tools change the Mac's built-in firewall, so changes made with Strict mode or Stealth mode can outlast the app.
Open System Settings, Network, Firewall, then Options. Check Block all incoming connections and Enable stealth mode, and set them the way you want.
The app may also have turned the Firewall switch on or changed the two Automatically allow options, which it calls Trust Apple apps and Trust verified downloaded apps. Set those the way you want too.
Step 6: Delete leftover Malwarebytes files
Read this first. Only move items with Malwarebytes in the name, and never delete anything inside /System. Skip anything that belongs to another Malwarebytes app you still use, such as AzireVPN.
Use the Finder, not Terminal, to delete, so each item goes to the Trash first. On a work Mac, leave these files to your IT team.
The vendor does not appear to publish a leftover list for version 5, but its documents show its naming. The version 4 guide keeps files in /Library/Application Support/Malwarebytes, and the ThreatDown guide names launch files com.malwarebytes. So search by name, not a fixed path.
This read-only command lists matching items in the usual folders and changes nothing:
find /Library/LaunchDaemons /Library/LaunchAgents /Library/PrivilegedHelperTools "/Library/Application Support" ~/Library/LaunchAgents ~/Library/"Application Support" ~/Library/Preferences ~/Library/Caches -maxdepth 1 -iname '*malwarebytes*' 2>/dev/nullFor each result, open the Finder, choose Go, then Go to Folder, paste the folder path, and drag the item to the Trash. A password prompt is normal. Empty the Trash and restart.
One file may stay. The v4 guide says a copy of an old extension can remain in /Library/StagedExtensions, locked by macOS. The vendor says it is not active, so leave it alone.

Confirm nothing from Malwarebytes is still running
- The Malwarebytes icon is gone from the menu bar.
- In Activity Monitor, choose View, then All Processes, and search for Malwarebytes. Version 4 ran background parts named Malwarebytes Agent and Malwarebytes Protection.
- Login Items & Extensions shows nothing from the vendor, and the Step 3 check prints nothing.
Two read-only Terminal checks finish the job. The first lists background jobs, including system ones only sudo can see. Your password does not show as you type.
sudo launchctl list | grep -i malwarebytesThe second lists any running task whose name or path has the word in it:
pgrep -ilf malwarebytesBoth should print nothing, apart from lines for another Malwarebytes app you kept, such as AzireVPN. If any other line shows, restart and run Step 2 again.

Reinstalling Malwarebytes cleanly
If you want the app back, follow the vendor's own order. Run the Step 2 tool, delete it and restart. Then reinstall with the vendor's Mac install steps.
Frequently Asked Questions
Does uninstalling Malwarebytes cancel my subscription?
No. Turn off auto-renewal in your online account. The plan stays active until its end date.
Why will another antivirus not install after I removed Malwarebytes?
A common cause is an extension or a background part that is still there. The vendor warns that its app and other antivirus apps can clash. Run Step 2, restart, then repeat the Step 3 check.
Why is the Malwarebytes icon still in my menu bar?
A common cause is that the app went to the Trash while its background parts kept running. Run the Step 2 tool, then restart.
Is it safe to click "I'll risk it" when uninstalling?
Yes. It is the vendor's wording for confirming the removal. The only change is that the app no longer runs on your Mac.
Does removing Malwarebytes leave my Mac unprotected?
It takes away what the app added. macOS keeps its own built-in guards, which Apple describes in its Platform Security guide: XProtect, and Gatekeeper with its notarization checks. Those keep working either way.
Removing other apps from this Mac
Every guide here uses the same pattern: the vendor's method, the leftovers, then a final check, all with Finder, System Settings and, now and then, Terminal.
- How to uninstall Kaspersky on Mac, with its system extension and removal tool.
- How to uninstall Trend Micro on Mac, with the network filter and work agents.
- How to uninstall Sublime Text on Mac, with the subl helper and your packages.
If you are weighing a cleaner app against doing this by hand, our CleanMyMac alternatives comparison covers the trade-offs. Nothing in these guides needs one.