How to Empty the Trash on Mac, Including Files That Will Not Delete
To empty the Trash on Mac, click the Trash icon in the Dock, then click Empty in the upper-right corner of the window and confirm with Empty Trash. You can also press Shift-Command-Delete in the Finder. Emptied items are deleted for good, and if the Trash will not empty, quit the app using the file or unlock it first.
Below are all the ways to empty the Trash, the settings that change how it behaves, and a fix for each common error.
Where the Trash is on your Mac
The Trash icon sits at the right end of the Dock. If you keep the Dock on the left or right side of the screen, the Trash sits at the bottom end instead. Clicking it opens the Trash in a Finder window, where you can see everything waiting to be deleted.
Moving something to the Trash does not delete it, and it does not free any space yet. Apple's guide to deleting files and folders on Mac says items are not deleted until you empty the Trash. On some English-language Macs, the same folder is called the Bin.
How to empty the Trash on Mac: three ways
All three methods below do the same job. Pick the one that suits how you work.
From the Dock and the Trash window
- Click the Trash icon in the Dock.
- In the window that opens, click Empty in the upper-right corner.
- In the warning that appears, click Empty Trash.
From the Finder menu
Click the desktop so the Finder is the active app. Then choose Finder > Empty Trash from the menu bar and click Empty Trash in the warning.
With a keyboard shortcut
Apple lists these shortcuts on its Mac keyboard shortcuts page. They work while the Finder is the active app.
| Shortcut | What it does |
|---|---|
| Command-Delete | Moves the selected item to the Trash |
| Shift-Command-Delete | Empties the Trash, with a warning first |
| Option-Shift-Command-Delete | Empties the Trash with no warning |
Delete one item immediately without emptying the whole Trash
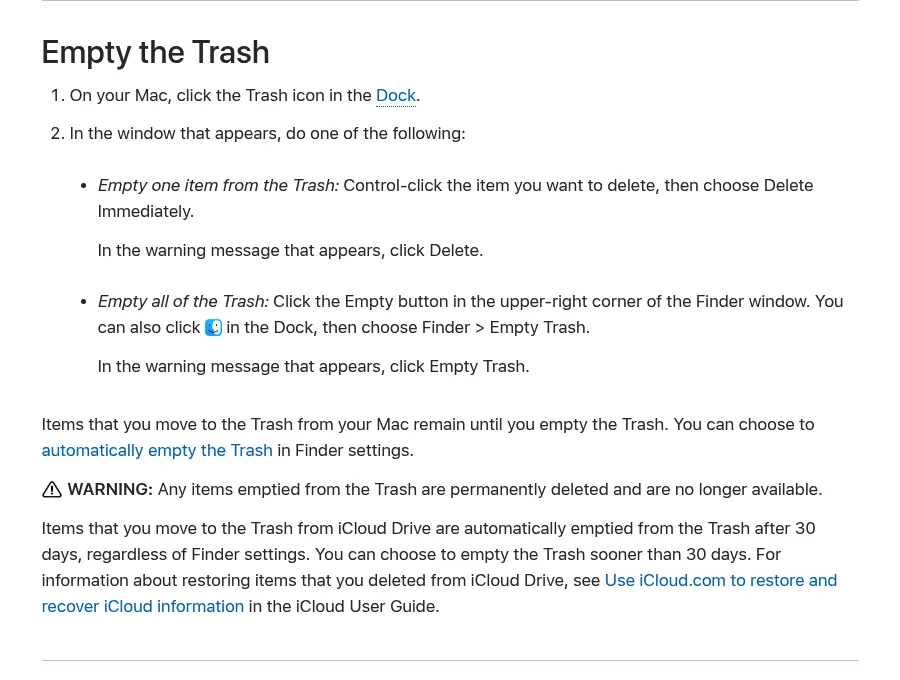
When the Trash holds files you may still want, Apple's method deletes just one item:
- Click the Trash icon in the Dock.
- Control-click the item you want to delete.
- Choose Delete Immediately.
- In the warning, click Delete.
The item is deleted for good, and everything else stays in the Trash.
Change the Trash warning and empty it automatically
The Finder has two Trash settings, both in the same place. On older versions of macOS this window was called Finder Preferences rather than Finder Settings.
Turn off the "Are you sure" warning
To skip the warning once, hold the Option key when you click Empty or choose Empty Trash. To turn it off for good, choose Finder > Settings, click Advanced, then deselect "Show warning before emptying the Trash."
Remove items from the Trash after 30 days
Choose Finder > Settings, click Advanced, then select "Remove items from the Trash after 30 days." From then on, anything that has sat in the Trash for 30 days is removed on its own. Those items are deleted for good, just as if you had emptied the Trash yourself.
iCloud Drive items follow their own 30-day rule
Items you move to the Trash from iCloud Drive follow a separate rule. Apple says they are emptied from the Trash after 30 days whatever your Finder settings say. You can still empty them sooner.
Changed your mind? Put items back before you empty
Until you empty it, getting an item back is easy:
- Click the Trash icon in the Dock.
- Drag the item out of the Trash, or select it and choose File > Put Back.
Put Back returns the item to the folder it came from. Once you empty the Trash, though, Apple is clear that the items are deleted and no longer available. So take a quick look through the Trash before you empty it, and keep a Time Machine backup or a copy on another drive in case you want something later.
Why the Trash won't empty, and how to fix each cause
First, read the exact message macOS shows. Then use the matching fix below.
"The operation can't be completed because the item is in use"
An app still has the file open, so macOS will not delete it. Switch to that app and press Command-Q to quit it, then empty the Trash again. If the app will not quit, force quit the app first. If you cannot tell which app is using the file, restart your Mac and try again.
The item is locked
Locked files are meant to resist being changed or deleted by accident. If a locked item is holding things up, unlock it first:
- Open the Trash and select the item.
- Choose File > Get Info, or press Command-I.
- Deselect the Locked checkbox.
- Close the Info window and empty the Trash.
Apple explains how locking works in Lock a document on Mac. If the Locked checkbox is greyed out, see the next fix.
You don't have permission
Some files belong to another user or to an administrator. macOS then asks for an administrator name and password, or Touch ID. In the Info window you may need to click the lock icon and enter those details before you can change the item. If you are not an administrator on this Mac, ask the person who is. Never change the permissions on system folders to get past this.
Files from an external drive won't go away
If you moved items to the Trash from an external drive, connect that drive before you empty the Trash. If the drive reports errors, run First Aid in Disk Utility, as Apple describes in how to repair a Mac storage device.
A "Recovered Files" folder appeared in the Trash
After a restart, a Recovered Files folder can show up in the Trash. Apple says these are temporary files that an app could not clean up because it quit unexpectedly. Open the folder and check it first: drag out anything useful, then empty the Trash. Apple's page on recovered files in the Trash has the details.
The disk is nearly full
When space is very tight, open the Trash and use Delete Immediately on the largest items first. Then empty the rest. Apple's guide to freeing up storage space on Mac confirms that space only comes back once the Trash is emptied.
Still stuck
Restart your Mac and try again. If that does not help, restart in safe mode, which stops certain software from loading as your Mac starts up, then try emptying the Trash again. Restart normally afterward. Apple explains the steps in Start up your Mac in safe mode.
You may see Terminal commands suggested elsewhere for forcing the Trash to empty. A single mistyped path in Terminal can delete the wrong files, so this guide sticks to Finder methods.
Emptied the Trash but the space did not come back
Two things explain most cases. First, the storage figure in System Settings > General > Storage can take a few minutes to catch up after you empty the Trash.

Second, when you drag an app to the Trash, only the app itself goes in. The settings, caches and other data it stored in your Library folders were never in the Trash, so emptying it leaves them behind. Our guides show the exact paths for each app, for example removing Xcode and its developer data or removing Steam and its game files. For anything else taking up room, see what System Data is and how to clear it safely.
Frequently Asked Questions
Where is the Trash on my Mac?
The Trash is at the right end of the Dock, or at the bottom end when the Dock is on the side of the screen. Clicking it opens the Trash in a Finder window.
Is there a faster way to empty the Trash on Mac?
Yes. Press Option-Shift-Command-Delete in the Finder to empty the Trash with no warning. You can also turn off the warning for good in Finder > Settings > Advanced.
Why can't I empty the Trash on my Mac?
Usually a file is still open in an app, an item is locked, you need administrator permission, or an external drive is not connected. Quit the app, unlock the item, enter administrator details or reconnect the drive, then try again.
Does emptying the Trash free up space?
Yes. Apple says space from a file in the Trash only becomes available once you empty it. The Storage figure can take a few minutes to update, and an app's Library data was never in the Trash, as covered in the section on space that did not come back.
How do I force empty the Trash on Mac?
Quit the apps using the files, unlock any locked items and restart your Mac. If the Trash still will not empty, restart in safe mode and try again, then restart normally, as described in the Still stuck fix above.
Removing other apps from this Mac
Emptying the Trash only finishes an uninstall once the app's leftovers are gone too. These guides show what each app leaves behind and where to find it:
- How to uninstall Google Chrome on Mac
- How to uninstall Microsoft Office on Mac
- How to uninstall Steam on Mac
- How to uninstall Xcode on Mac
The full list of removal guides covers the rest. If your app is not covered yet, email hello@uninstallonmac.com with the app's name and version and your macOS version.