How to Uninstall Adobe Acrobat on Mac (Reader and Pro, Leftovers Included)
To uninstall Adobe Acrobat on Mac, quit Acrobat, open Finder > Applications > Adobe Acrobat and double-click Acrobat Uninstaller, then restart. Free Acrobat Reader has no uninstaller: drag Adobe Acrobat Reader to the Trash. Then clear the Acrobat folders in your Library, remove the browser extension and make Preview your default PDF app again.
That is the short answer to how to uninstall Adobe Acrobat on Mac. The rest of this guide covers what each step leaves behind, so no updater keeps running and PDFs stop opening in an app that is gone.
The full removal, in order:
- Check which Acrobat you have, then sign out.
- Run Acrobat Uninstaller, or move free Reader to the Trash.
- Use Adobe's AcroCleaner only if that fails.
- Clear the leftover folders in your Library.
- Remove the updater and its background helpers.
- Remove browser add-ons and set Preview as the PDF app.
- Check that nothing is still running.
Why dragging Acrobat to the Trash is not enough
The app you see is only part of the install. Adobe's admin guide for Mac says the installer also puts support files and settings files in your Library folder.
There is more outside your home folder. Acrobat keeps files for all users in /Library/Application Support/Adobe, and its updater has a folder there too. You may also have a browser add-on, and Acrobat may now be the app that opens every PDF.
Apple's advice on how to delete or uninstall apps on Mac is to use an app's own uninstaller when it has one, since that also removes login items and data kept elsewhere. Paid Acrobat has one. Free Reader does not, so Steps 4 to 7 matter more for Reader.
If disk space is your real reason, first see what is actually filling your disk.
Before you start: which Acrobat do you have?
Free Acrobat Reader or paid Acrobat Standard and Pro
Open your Applications folder. Adobe's admin guide lists the default names:
- Free Reader is one app called Adobe Acrobat Reader.
- Paid Acrobat (Standard or Pro) is a folder called Adobe Acrobat. Inside are the app and Acrobat Uninstaller.
- Older installs can carry a year, such as Adobe Acrobat 2020. Very old ones may say Adobe Reader.
Some Macs have both. If you want to keep one, read the warnings in Steps 4 and 5 first. Adobe lists the same user data folder for Acrobat and Reader, so the two share some files.
Save your work and sign out
Save any open PDFs, then sign out so your licence is free for another Mac. Adobe's page on how to sign out and deactivate Adobe apps gives the route: open the app, then choose Help > Sign Out. Adobe notes this signs you out of all Adobe apps on the Mac.
Uninstalling does not end a paid plan. Apple says deleting an app does not cancel a subscription bought with it.
To stop billing, cancel the plan in your Adobe account: sign in, open Plans and payment, choose Manage plan, then Cancel your plan. If you bought the plan through the App Store or another reseller, cancel it there instead.
Your own PDFs are safe. The steps here remove Acrobat's files from this Mac, and none of them touch PDFs saved in your own folders.
Step 1: Uninstall Adobe Acrobat on Mac with Acrobat Uninstaller
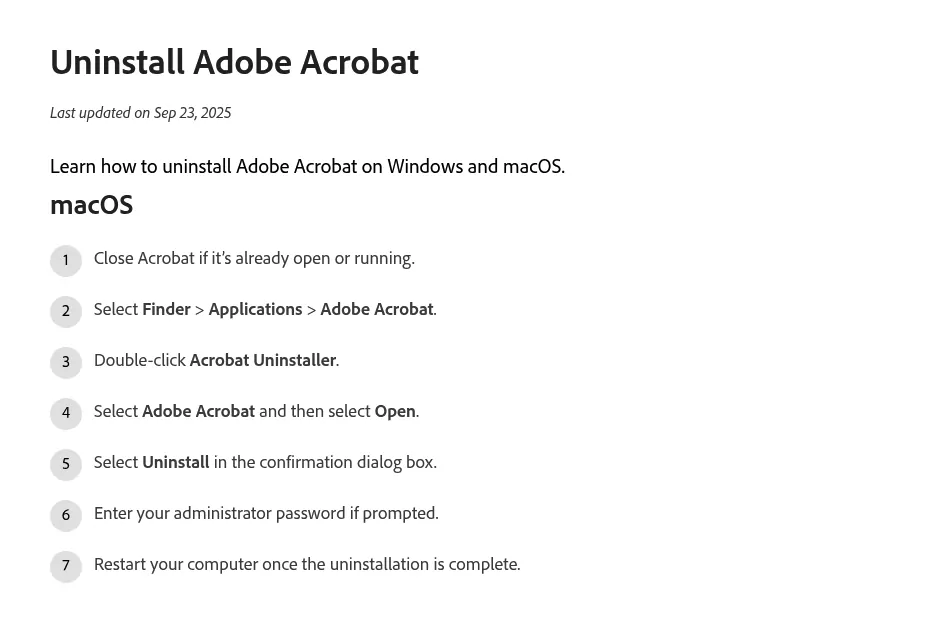
This is Adobe's route for paid Acrobat. The steps come from Adobe's Uninstall Adobe Acrobat page:
- Close Acrobat if it is open or running.
- Select Finder > Applications > Adobe Acrobat.
- Double-click Acrobat Uninstaller.
- Select Adobe Acrobat, then select Open.
- Select Uninstall in the confirmation dialog.
- Enter your admin password if asked. That prompt is normal.
- Restart your Mac when it is done.
If Acrobat came with Creative Cloud, remove it from the Creative Cloud desktop app instead. Adobe's page on how to uninstall Creative Cloud apps says to go to Apps > All Apps, select More actions (the three dots) next to the app, then Uninstall. Choose Remove to clear its settings too, or Keep to hold on to them.
If the Acrobat Uninstaller icon is missing but the app is still there, Adobe's admin guide gives a Terminal command that removes and deactivates Acrobat. First, check that the helper exists at the default path:
ls "/Applications/Adobe Acrobat/Adobe Acrobat.app/Contents/Helpers/"If the list shows Acrobat Uninstaller.app, you can run Adobe's remover. It runs with admin rights and asks for your password.
Warning: this removes and deactivates Acrobat at once. There is no confirmation dialog, and it cannot be undone. Save your work and sign out first, then paste the command exactly as written:
sudo "/Applications/Adobe Acrobat/Adobe Acrobat.app/Contents/Helpers/Acrobat Uninstaller.app/Contents/Library/LaunchServices/com.adobe.Acrobat.RemoverTool" Uninstall "/Applications/Adobe Acrobat/Adobe Acrobat.app"Those paths match a default install. If your folder carries a year, use the Finder route or Step 3 instead.
Step 2: Remove free Acrobat Reader
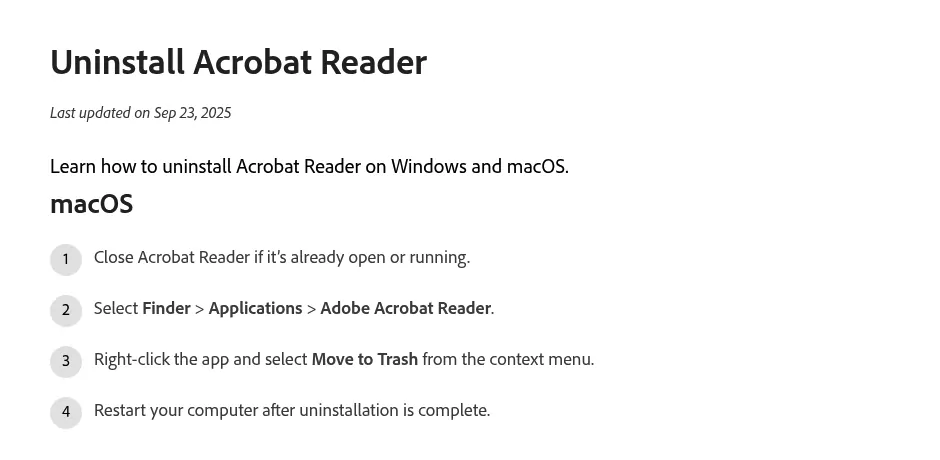
This is how to uninstall Adobe Reader on Mac, and Adobe gives no uninstaller for it. Adobe's Uninstall Acrobat Reader page gives four steps:
- Close Acrobat Reader if it is open or running.
- Select Finder > Applications > Adobe Acrobat Reader.
- Right-click the app and choose Move to Trash.
- Restart your Mac.
macOS may ask for an admin name and password when you move it. Apple says that is expected. Empty the Trash once you are sure.
Step 3: Use AcroCleaner if the uninstaller fails or is missing
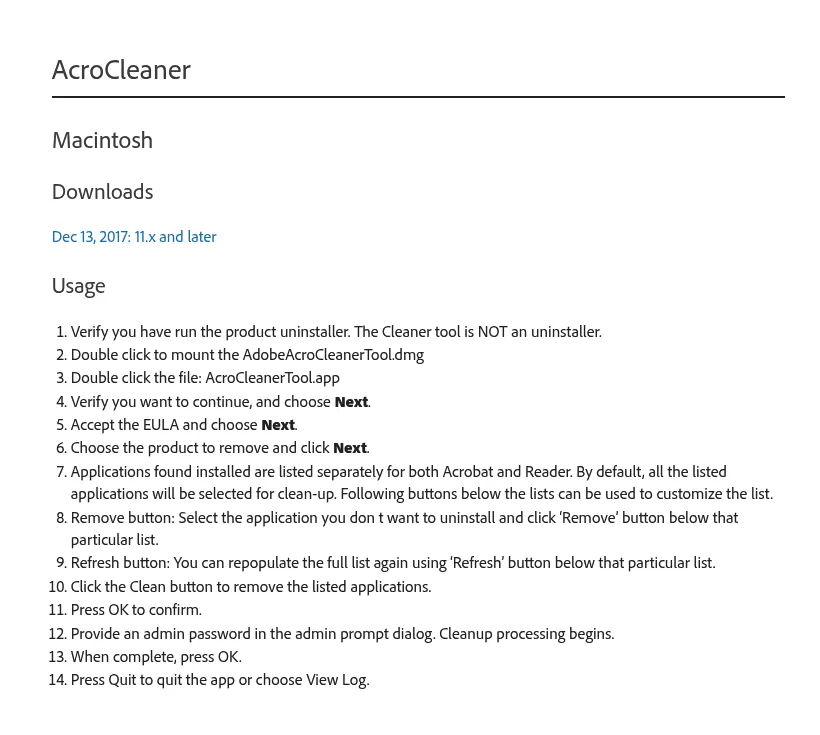
AcroCleaner is Adobe's tool for broken installs. Adobe's AcroCleaner page is clear that it is not an uninstaller. It is a last resort after a failed or partial removal.
Check three limits first:
- It works only on standalone Acrobat or Reader, version 11 and later on Mac.
- Adobe's notes for the tool (given in its Windows section) say it cannot be used with Creative Cloud products, or with Acrobat that came with Creative Suite. Use the Creative Cloud route in Step 1 for those.
- The same notes say it deletes Acrobat data for good, so back up anything you care about.
Quit Acrobat or Reader first, then open Activity Monitor. Adobe names AcroCEF and RdrCEF as its background tasks on Mac.
Select any with those names, click the Stop button, then choose Quit, as Apple explains in how to quit a process in Activity Monitor. Leave other Adobe tasks alone if you keep other Adobe apps.
Then follow Adobe's Mac steps:
- Download the Mac version from Adobe's page and double-click AdobeAcroCleanerTool.dmg.
- Double-click AcroCleanerTool.app.
- Confirm you want to go on, and choose Next.
- Accept the licence and choose Next.
- Choose the product to remove and click Next. To keep one app, select it and click Remove.
- Click Clean, then OK to confirm.
- Enter your admin password. When it is done, press OK, then Quit.
The tool writes a log to ~/Library/Logs/Adobe/AcroCleanerTool.log. The Mac download on Adobe's page is dated December 13, 2017. If it will not open on your Mac, skip it: Steps 4 and 5 clear the same leftovers by hand.
Step 4: Clear Acrobat's Application Support, Preferences and Caches folders
These folders survive a Trash drag, and often the uninstaller too. To open one, use Finder's Go > Go to Folder and type the path. The ~ means your home folder.
Keep your other Adobe apps safe. The Adobe folders below are shared, and on a Mac with Creative Cloud they also hold settings and sync data for apps such as Photoshop. Delete only items named Acrobat or Reader, never a whole Adobe folder.
Adobe's own docs name these places:
-
~/Library/Application Support/Adobe/Acrobat, the app data folder. Adobe lists it for both Acrobat and Reader, so leave it if you keep either one. -
~/Library/Preferences/com.adobe.Acrobat.Pro.plist, the Acrobat settings file. -
~/Library/Preferences/com.adobe.Reader.plist, the Reader settings file. -
/Library/Application Support/Adobe/Acrobatfor Acrobat, and/Library/Application Support/Adobe/Acrobat Readerfor Reader. - Log files with Acrobat in the name, inside
~/Library/Logs/Adobe.
Two more places are worth a look. If ~/Library/Preferences/Adobe exists, look inside for a subfolder named Acrobat. Then list any cache items named for Acrobat or Reader. This command only reads, and prints the full path of each match:
find ~/Library/Caches ~/Library/HTTPStorages ~/Library/"Saved Application State" -maxdepth 1 \( -iname 'com.adobe.acrobat*' -o -iname 'com.adobe.reader*' \)Drag each item it prints to the Trash in Finder, and enter your admin password for items in /Library. On a work Mac you may also find Acrobat or Reader settings files in /Library/Preferences. Adobe says an admin creates those, so ask your IT team first.
Step 5: Remove the Acrobat updater and its background helpers
Acrobat checks for updates with a helper that runs on its own. Adobe's updater reference for Mac keeps its settings in /Library/Application Support/Adobe/ARMDC, so ARMDC is the name to look for. If you still have Acrobat or Reader, skip this step, because the updater may still serve the app you keep.
First, list any background items with ARMDC in the name. This only reads:
find /Library/LaunchDaemons /Library/LaunchAgents /Library/PrivilegedHelperTools ~/Library/LaunchAgents -maxdepth 1 -iname '*armdc*'If it prints nothing, there is nothing left to remove. If it prints paths, Finder is the safest way to remove them: use Go to Folder for each one, drag that item to the Trash and enter your password. Then do the same for the ARMDC folder in /Library/Application Support/Adobe.
Warning before you use Terminal instead: sudo rm deletes at once, skips the Trash and cannot be undone. Remove one file at a time, using a path exactly as the list printed it. The -i flag asks you to confirm each one:
sudo rm -i "PASTE-ONE-FULL-PATH-FROM-THE-LIST"Never use a pattern such as *adobe* here. It would also catch files that belong to Creative Cloud or other Adobe apps. When you are done, restart your Mac.
Step 6: Remove the browser PDF plug-in and extensions
Safari
Open Safari, choose Safari > Settings, then click Extensions. If you see an Adobe or Acrobat entry, select it and click Uninstall, as Apple's guide to Safari extensions shows. Safari itself stays because it is part of macOS, but there is a guide on what you can clean out of Safari instead.
Older Acrobat installers could also add a browser plug-in. Use Go to Folder to open /Library/Internet Plug-Ins. If you find an item with Adobe and PDF in its name, drag it to the Trash.
Chrome
Adobe's page on the Acrobat extension for Chrome says to manage it from the Extensions icon on the Chrome toolbar. Click that icon, click the three dots next to Adobe Acrobat, choose Remove from Chrome, then confirm with Remove. If you use Microsoft Edge, check its list the same way.
Step 7: Make Preview your default PDF app again
If Acrobat was your PDF app, macOS may keep trying to use it. Apple's steps to choose an app to open a file fix it for every PDF at once:
- In Finder, select any PDF.
- Choose File > Get Info.
- Click the arrow next to Open with.
- Choose Preview from the pop-up menu, then click Change All.
- Click Continue when macOS asks you to confirm.
This matters most if you had both apps. Adobe's AcroCleaner page notes that removing the one that was the default can leave the other unable to take over. Adobe's fix is to repair the app you kept and restart.
Confirm nothing from Adobe Acrobat is still running
Restart first, then run these checks. They take two minutes.
Activity Monitor. Type Acro in the search field, then RdrCEF, and nothing should show up. If something does, select it, click the Stop button, then choose Quit.
Login Items & Extensions. Apple's page on Login Items & Extensions settings shows where apps that run in the background are listed. The label depends on your macOS version:
- macOS Tahoe 26 and later: System Settings > General > Login Items & Extensions, under App Background Activity.
- macOS Sequoia 15: the same pane, under Allow in the Background.
- macOS Sonoma 14 and Ventura 13: System Settings > General > Login Items, under Allow in the Background.
Look for entries from Adobe or Acrobat. If you keep other Adobe apps, their Creative Cloud entries belong there, so leave them. The Trend Micro guide shows how background items outlive an app in more detail.
Terminal. The commands below only list what is loaded. This one covers jobs for your own user account:
launchctl list | grep -i adobeIt will not show system jobs such as the updater from Step 5. This one does, and asks for your password:
sudo launchctl list | grep -i adobeThis last one shows the daemon files themselves, loaded or not:
ls /Library/LaunchDaemons | grep -i adobeNo output means no Adobe background jobs remain. If you keep Creative Cloud, some Adobe lines are expected. What matters is that nothing with Acrobat or ARMDC in the name remains.
Reinstalling Acrobat cleanly
If you are removing Acrobat to fix a problem, finish Steps 1 to 5 and restart before you reinstall. Then install a fresh copy from Adobe, or from the Creative Cloud desktop app if that is where your plan lives. Sign in once it opens, and your licence moves to the new install.
Frequently Asked Questions
Does Adobe Acrobat Reader have an uninstaller on Mac?
No. Adobe does not provide one for Reader on Mac. Its documented route is to move the app to the Trash and restart, and Steps 4 to 7 then clear the leftovers.
Why won't Adobe Acrobat uninstall from my Mac?
Three things usually cause it: the app or one of its helpers is still running, the copy is managed by Creative Cloud, or your account is not an admin account. Quit the app and any AcroCEF or RdrCEF tasks, then try again. If a standalone install still fails, see Step 3.
Will uninstalling Acrobat delete my PDF files?
No. Your PDFs are your own files, and no step in this guide touches PDFs in your own folders, though their icons may change once Preview is the default. AcroCleaner does delete Acrobat's own data, such as settings, so back those up first.
Why do PDFs still try to open in Acrobat after I uninstalled it?
Usually macOS is still set to use Acrobat for PDFs, or another copy, such as Reader or an older version, is still there. Check your Applications folder, then set Preview as the default with Step 7.
Removing other apps from this Mac
Acrobat is a mid-sized cleanup: one app, a shared updater and a few Library folders. Other apps go further. Security software often adds extensions and background items, as the guides to uninstalling Kaspersky on Mac and removing Trend Micro and its leftovers show.
Simpler apps still hide a trick or two, such as the command line helper covered in the Sublime Text removal guide. And if you hoped to remove the browser that came with your Mac, the Safari guide explains what you can safely clear instead. Each guide uses only Finder, System Settings and, now and then, Terminal.